Java 教程 | NIO
Java NIO是java 1.4之后新出的一套IO接口,这里的的新是相对于原有标准的Java IO和Java Networking接口。NIO提供了一种完全不同的操作方式。
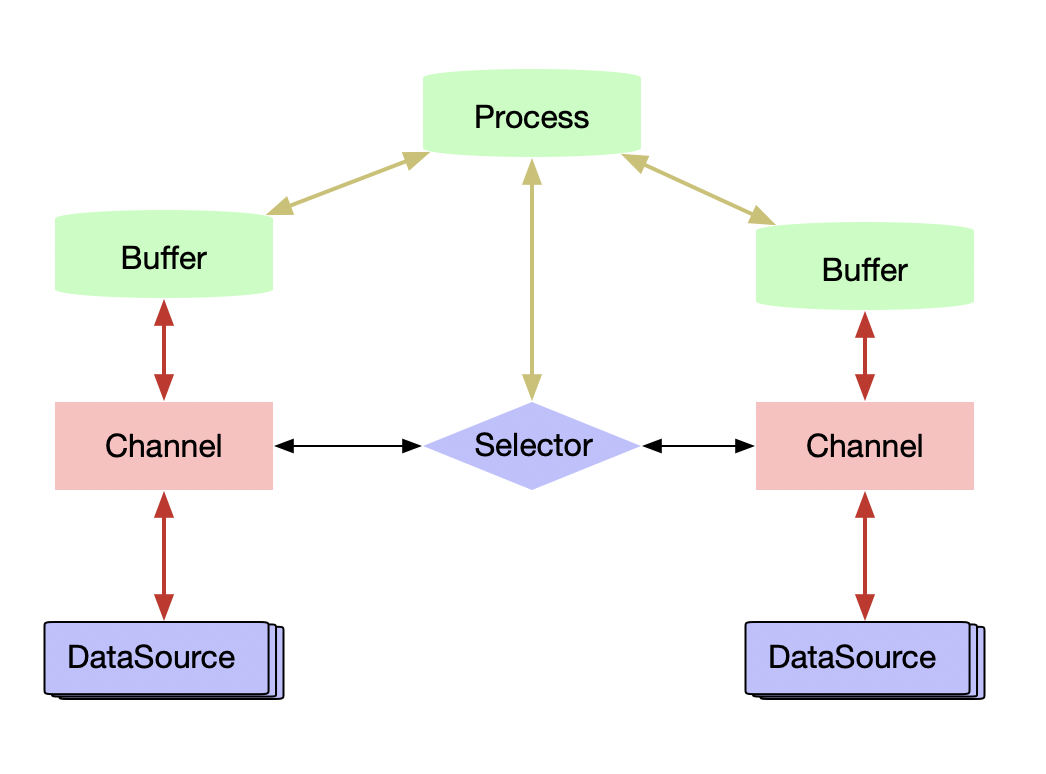
NIO包含下面几个核心的组件:
- Channels : 主要负责对接数据源, 主要用于读取或写入数据到数据源。
- Buffers : 主要用于存储来自 channel 拉取的数据或维护将要写入channel的数据
- Selectors : 多路复用,对接多个channels 及时监听已经准备好读或者写的channel, 避免在一个channels 上浪费太多时间等待。
整个NIO体系包含的类远远不止这几个,但是在笔者看来Channel,Buffer和Selector组成了这个核心的API
Channel
Channel和IO中的Stream(流)是差不多一个等级的。只不过Stream是单向的,譬如:InputStream, OutputStream.而Channel是双向的,既可以用来进行读操作,又可以用来进行写操作。
NIO中的Channel的主要实现有 :
- FileChannel
- DatagramChannel
- SocketChannel
- ServerSocketChannel
FileChannel
1
2
RandomAccessFile aFile = new RandomAccessFile("data/nio-data.txt", "rw");
FileChannel inChannel = aFile.getChannel();
| 方法 | 描述 |
|---|---|
read(buf) | 从文件channel 中获取数据放到 buffer 中 |
write(buf) | 将buffer中的数据写到channel文件中 |
position(), position(pos) | 获取或设置文件的当前操作位置 |
size() | channel 文件大小 |
truncate() | 文件截取 |
lock() | 文件锁 |
SocketChannel
client socket channel
1
2
SocketChannel socketChannel = SocketChannel.open();
socketChannel.connect
| 方法 | 描述 |
|---|---|
| connect() | 如果我们设置了一个SocketChannel是非阻塞的,那么调用connect()后,方法会在链接建立前就直接返回。为了检查当前链接是否建立成功,我们可以调用finishConnect(), |
| write(buf) | 在非阻塞模式下,调用write()方法不能确保方法返回后写入操作一定得到了执行。因此我们需要把write()调用放到循环内。 |
| read(buf) | 在非阻塞模式下,调用read()方法也不能确保方法返回后,确实读到了数据。因此我们需要自己检查的整型返回值,这个返回值会告诉我们实际读取了多少字节的数据。 |
ServerSocketChannel
server socket channel
1
2
3
4
5
6
ServerSocketChannel serverSocketChannel = ServerSocketChannel.open();
serverSocketChannel.socket().bin(new InetSocketAddress(9999));
while(true) {
  SocketChannel socketChannel = serverSocketChannel.accept();
  //do something with socketChannel...
}
DatagramChannel
udp server socket
1
2
DatagramChannel channel = DatagramChannel.open();
channel.socket().bind(new InetSocketAddress(9999));
Buffer
使用Buffer一般遵循下面几个步骤:
- 分配空间 :
ByteBuffer buf = ByteBuffer.allocate(1024); - 写入数据到Buffer :
int bytesRead = fileChannel.read(buf); - 调用filp()方法, 将缓存职位读状态 :
buf.flip() - 从Buffer中读取数据 :
System.out.print((char)buf.get()); - 调用
clear()方法或者compact()方法
| 属性 | 描述 |
|---|---|
| Capacity | 容量,即可以容纳的最大数据量;在缓冲区创建时被设定并且不能改变 |
| Limit | 表示缓冲区的当前终点,不能对缓冲区超过极限的位置进行读写操作。且极限是可以修改的 |
| Position | 位置,下一个要被读或写的元素的索引,每次读写缓冲区数据时都会改变改值,为下次读写作准备 |
| Mark | 标记,调用mark()来设置 mark=position,再调用reset()可以让position恢复到标记的位置 |
实例化
| 方法 | 描述 |
|---|---|
allocate(int capacity) | 从堆空间中分配一个容量大小为capacity的byte数组作为缓冲区的byte数据存储器 |
allocateDirect(int capacity) | 是不使用JVM堆栈而是通过操作系统来创建内存块用作缓冲区,它与当前操作系统能够更好的耦合,因此能进一步提高I/O操作速度。但是分配直接缓冲区的系统开销很大,因此只有在缓冲区较大并长期存在,或者需要经常重用时,才使用这种缓冲区 |
wrap(byte[] array) | 这个缓冲区的数据会存放在byte数组中,bytes数组或buff缓冲区任何一方中数据的改动都会影响另一方。其实ByteBuffer底层本来就有一个bytes数组负责来保存buffer缓冲区中的数据,通过allocate方法系统会帮你构造一个byte数组 |
wrap(byte[] array, int offset, int length) | 在上一个方法的基础上可以指定偏移量和长度,这个offset也就是包装后byteBuffer的position,而length呢就是limit-position的大小,从而我们可以得到limit的位置为length+position(offset) |
常用方法
| 方法 | 描述 |
|---|---|
limit(), limit(10) | 读取或设置操作的内存上限 |
reset() | 把position设置成mark的值,相当于之前做过一个标记,现在要退回到之前标记的地方 |
clear() | position = 0;limit = capacity;mark = -1; 有点初始化的味道,但是并不影响底层byte数组的内容 |
flip() | limit = position;position = 0;mark = -1; 翻转,也就是让flip之后的position到limit这块区域变成之前的0到position这块,翻转就是将一个处于存数据状态的缓冲区变为一个处于准备取数据的状态 |
rewind() | 把position设为0,mark设为-1,不改变limit的值 |
remaining() | return limit - position; 返回limit和position之间相对位置差 |
hasRemaining() | return position < limit 返回是否还有未读内容 |
compact() | 把从position到limit中的内容移到0到limit-position的区域内,position和limit的取值也分别变成limit-position、capacity。如果先将positon设置到limit,再compact,那么相当于clear() |
get() | 相对读,从position位置读取一个byte,并将position+1,为下次读写作准备 |
get(int index) | 绝对读,读取byteBuffer底层的bytes中下标为index的byte,不改变position |
get(byte[] dst, int offset, int length) | 从position位置开始相对读,读length个byte,并写入dst下标从offset到offset+length的区域 |
put(byte b) | 相对写,向position的位置写入一个byte,并将postion+1,为下次读写作准备 |
put(int index, byte b) | 绝对写,向byteBuffer底层的bytes中下标为index的位置插入byte b,不改变position |
put(ByteBuffer src) | 用相对写,把src中可读的部分(也就是position到limit)写入此byteBuffer |
put(byte[] src, int offset, int length) | 从src数组中的offset到offset+length区域读取数据并使用相对写写入此byteBuffer |
案例:
1
2
3
4
5
6
7
8
9
10
11
12
13
14
15
16
17
RandomAccessFile aFile = new RandomAccessFile("data/nio-data.txt", "rw");
FileChannel inChannel = aFile.getChannel();

//create buffer with capacity of 48 bytes
ByteBuffer buf = ByteBuffer.allocate(48);

int bytesRead = inChannel.read(buf); //read into buffer.
while (bytesRead != -1) {
  buf.flip();  //make buffer ready for read
  while(buf.hasRemaining()){
      System.out.print((char) buf.get()); // read 1 byte at a time
  }

  buf.clear(); //make buffer ready for writing
  bytesRead = inChannel.read(buf);
}
aFile.close();
Scatter/Gather
Java NIO发布时内置了对 scatter/gather 的支持。scatter/gather 是通过通道读写数据的两个概念。
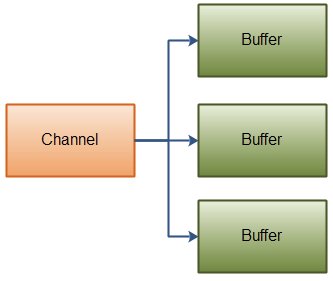
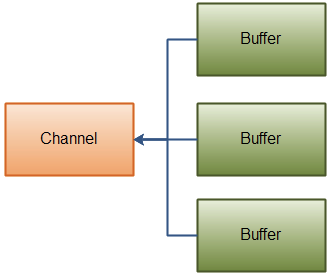
Scattering read 指的是从通道读取的操作能把数据写入多个 buffer,也就是 sctters 代表了数据从一个channel到多个buffer的过程。 gathering write 则正好相反,表示的是从多个 buffer 把数据写入到一个 channel 中。
Scattering Reads
“scattering read”是把数据从单个Channel写入到多个buffer,下面是示意图:
1
2
3
4
ByteBuffer header = ByteBuffer.allocate(128);
ByteBuffer body   = ByteBuffer.allocate(1024);
ByteBuffer[] bufferArray = { header, body };
channel.read(bufferArray);
实际上,scattering read内部必须写满一个buffer后才会向后移动到下一个buffer,因此这并不适合消息大小会动态改变的部分,也就是说,如果你有一个header和body,并且header有一个固定的大小(比如128字节),这种情形下可以正常工作。
Gathering Writes
1
2
3
4
5
6
ByteBuffer header = ByteBuffer.allocate(128);
ByteBuffer body   = ByteBuffer.allocate(1024);

ByteBuffer[] bufferArray = { header, body };

channel.write(bufferArray);
类似的传入一个buffer数组给write,内部机会按顺序将数组内的内容写进channel,这里需要注意,写入的时候针对的是buffer中position到limit之间的数据。也就是如果buffer的容量是128字节,但它只包含了58字节数据,那么写入的时候只有58字节会真正写入。 因此gathering write是可以适用于可变大小的message的,这和scattering reads不同。
Selector
创建Selector
1
Selector selector = Selector.open();
注册Channel到Selector上
1
2
channel.configureBlocking(false);
SelectionKey key = channel.register(selector, SelectionKey.OP_READ);
Channel必须是非阻塞的。所以FileChannel不适用Selector,因为FileChannel不能切换为非阻塞模式。Socket channel可以正常使用。
如果对多个事件感兴趣可利用位的或运算结合多个常量,比如:
1
int interestSet = SelectionKey.OP_READ | SelectionKey.OP_WRITE;
校验事件:
1
2
3
4
selectionKey.isAcceptable();
selectionKey.isConnectable();
selectionKey.isReadable();
selectionKey.isWritable();
从SelectionKey操作Channel和Selector非常简单:
1
2
Channel  channel  = selectionKey.channel();
Selector selector = selectionKey.selector();
完整的Selector案例
1
2
3
4
5
6
7
8
9
10
11
12
13
14
15
16
17
18
19
20
21
22
23
24
25
26
27
28
29
30
31
32
33
34
35
36
Selector selector = Selector.open();

channel.configureBlocking(false);

SelectionKey key = channel.register(selector, SelectionKey.OP_READ);

while(true) {

  int readyChannels = selector.select();

  if(readyChannels == 0) continue;

  Set<SelectionKey> selectedKeys = selector.selectedKeys();

  Iterator<SelectionKey> keyIterator = selectedKeys.iterator();

  while(keyIterator.hasNext()) {

    SelectionKey key = keyIterator.next();

    if(key.isAcceptable()) {
        // a connection was accepted by a ServerSocketChannel.

    } else if (key.isConnectable()) {
        // a connection was established with a remote server.

    } else if (key.isReadable()) {
        // a channel is ready for reading

    } else if (key.isWritable()) {
        // a channel is ready for writing
    }

    keyIterator.remove();
  }
}
MMAP
JAVA处理大文件, 一般用 BufferedReader, BufferedInputStream 这类带缓冲的IO类, 不过如果文件超大的话, 更快的方式是采用 MappedByteBuffer. MappedByteBuffer是NIO引入的文件内存映射方案,读写性能极高。NIO最主要的就是实现了对异步操作的支持.
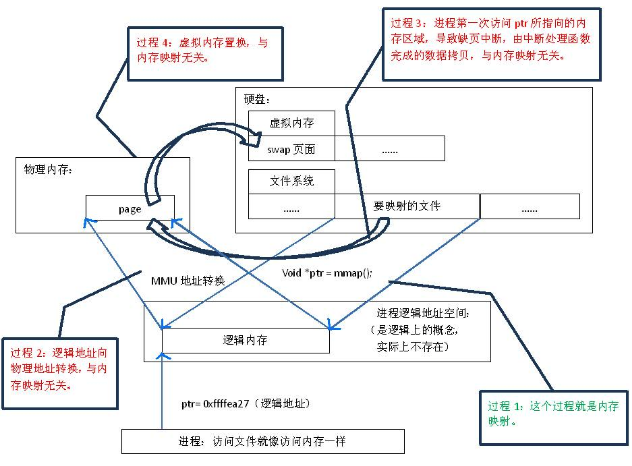
JVM 进程通过内存映射方式加载的物理文件并不会耗费同等大小的物理内存。当应用程序访问数据时,程序通过虚拟地址寻址对应的内存页,如果物理内存中不存在对应页,MMU则会产生缺页中断异常,CPU尝试从系统Swap分区中查找,如仍不存在,则会直接从硬盘中物理文件中读取。
传统的基于文件流的方式读取文件方式是系统指令调用,文件数据首先会被读取到进程的内核空间的缓冲区,而后复制到进程的用户空间,这个过程中存在两次数据拷贝;而内存映射方式读取文件的方式,也是系统指令调用,在产生缺页中断后,CPU直接从磁盘文件load数据到进程的用户空间,只有一次数据拷贝。
FileChannel提供了map方法把磁盘文件映射到虚拟内存,通常情况可以映射整个文件,如果文件比较大,可以进行分段映射。
内存映像文件访问的方式,共三种:
- MapMode.READ_ONLY:只读,试图修改得到的缓冲区将导致抛出异常。
- MapMode.READ_WRITE:读/写,对得到的缓冲区的更改最终将写入文件;但该更改对映射到同一文件的其他程序不一定是可见的。
- MapMode.PRIVATE:私用,可读可写,但是修改的内容不会写入文件,只是buffer自身的改变。
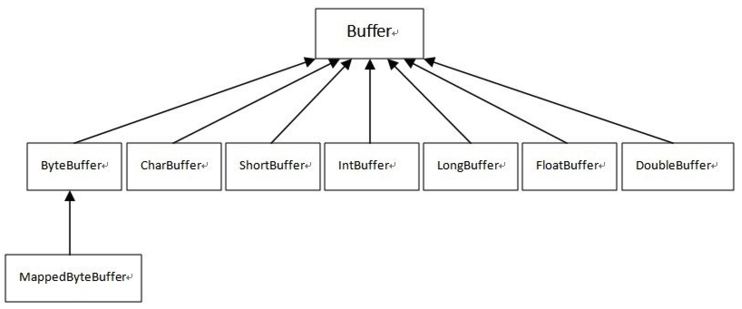
MappedByteBuffer是ByteBuffer的子类,其扩充了三个方法:
force():缓冲区是READ_WRITE模式下,此方法对缓冲区内容的修改强行写入文件;load():将缓冲区的内容载入内存,并返回该缓冲区的引用;isLoaded():如果缓冲区的内容在物理内存中,则返回真,否则返回假;
MappedByteBuffer 在处理大文件时的确性能很高,但也存在一些问题,其所对应的内存使用的是JVM堆外内存, JVM young gc 和 CMS gc 并不能触发回收 MappedByteBuffer 对应的内存,只有 full gc(stop the world的方式)可以使其回收内存,堆外直接内存会根据自己的情况(当需要新分配直接内存时,如果所剩堆外内存空间不够,第一次产生 OutOfMemoryError 时)来触发 System.gc(),此处有坑,若JVM配置了参数-XX:DisableExplicitGC,System.gc()将不会触发full gc,最终导致内存泄漏。而且触发其内存回收的时间点是不确定的。
案例 :
1
2
3
4
5
6
7
8
9
10
11
12
13
14
15
16
17
18
19
20
21
22
23
24
25
26
27
28
public static void method3(){
  RandomAccessFile aFile = null;
  FileChannel fc = null;
  try{
      aFile = new RandomAccessFile("src/1.ppt","rw");
      fc = aFile.getChannel();
      long timeBegin = System.currentTimeMillis();
      MappedByteBuffer mbb = fc.map(FileChannel.MapMode.READ_ONLY, 0, aFile.length());
      // System.out.println((char)mbb.get((int)(aFile.length()/2-1)));
      // System.out.println((char)mbb.get((int)(aFile.length()/2)));
      //System.out.println((char)mbb.get((int)(aFile.length()/2)+1));
      long timeEnd = System.currentTimeMillis();
      System.out.println("Read time: "+(timeEnd-timeBegin)+"ms");
  }catch(IOException e){
      e.printStackTrace();
  }finally{
      try{
          if(aFile!=null){
              aFile.close();
          }
          if(fc!=null){
              fc.close();
          }
      }catch(IOException e){
          e.printStackTrace();
      }
  }
}
参考资料

