Spring 教程 | Bean之配置文件的装载方式
介绍:
Spring Core 中有两大部分组成 : IOC, AOP.这里我们开始介绍IOC.
IOC(控制反转) 本质上就是将对象的构造与依赖关系交给IOC框架去维护。 用户只需要配置构造成员参数跟对象依赖关系。 框架帮你自动构建初始化对象。我们只需要从容器中拿取即可,不必在显示的 new 对象。 又称为依赖注入技术(DI).
依赖:
1
2
3
4
5
6
7
8
9
10
11
12
13
14
15
16
17
18
<dependency>
  <groupId>org.springframework</groupId>
  <artifactId>spring-context</artifactId>
</dependency>
<!-- https://mvnrepository.com/artifact/org.springframework/spring-core -->
<dependency>
  <groupId>org.springframework</groupId>
  <artifactId>spring-core</artifactId>
</dependency>
<!-- https://mvnrepository.com/artifact/org.springframework/spring-beans -->
<dependency>
  <groupId>org.springframework</groupId>
  <artifactId>spring-beans</artifactId>
</dependency>
<dependency>
    <groupId>org.springframework</groupId>
    <artifactId>spring-expression</artifactId>
</dependency>
举个例子 :
假设有个bean HelloWorld :
1
2
3
4
5
6
7
8
9
10
11
12
13
14
15
public class HelloWorld {
    private String name;

    public HelloWorld(String name) {
        this.name = name;
    }

    public String getName() {
        return name;
    }

    public void setName(String name) {
        this.name = name;
    }
}
使用 ioc 容器调用的方式为:
1
2
3
4
ApplicationContext ioc = new ClassPathXmlApplicationContext("com/saligia/spring/bean/helloworld/hello-world.xml");

HelloWorld helloWorld = (HelloWorld)ioc.getBean("hello");
System.out.println(helloWorld.getName());
因为 ioc 容器已经通过我们配置的依赖 hello-world.xml, 帮助我们初始化了对象并放入了容器中。所以我们免去了 new 的过程而直接从容器中get即可。
大体先看一下我们hello-world.xml的配置方式 :
1
2
3
<bean id="hello" class="com.saligia.spring.bean.helloworld.HelloWorld">
    <constructor-arg name="name" value="saliigia"></constructor-arg>
</bean>
从上面可以看出, 我们这里的 id 就是这个bean 的标识符。 也是这个标志,我们可以从ioc容器中通过get方法拿到。 class 参数指示这个bean的关联对象。 我们这个通过 constructor-arg来传入构造参数, 最终将被调用public HelloWorld(String name)构造方法。将我们提供的参数传递进去。
到这里我们就看明白了, IOC 主要负责对象构造与管理
Spring Bean 的配置细节
1. 对于构造函数的初始化方式:
- java class:
1
public HelloWorld(String name, int value)
- xml :
1
2
3
4
<bean id="hello" class="com.saligia.spring.bean.helloworld.HelloWorld">
  <constructor-arg name="value" value="30"></constructor-arg>
  <constructor-arg name="name" value="saligia"></constructor-arg>
</bean>
对于构造函数的参数,我们通过 constructor-arg 属性来完成注入参数的配置。 可以看出我们可以通过name 完成映射, 如果不提供name属性,则容器将按照顺序解析填充。
2. 对于 setter 的初始化方式:
- java :
1
2
public void setName(String name);
public void setValue(int value);
- xml :
1
2
3
4
<bean id="hello" class="com.saligia.spring.bean.helloworld.HelloWorld">
    <property name="name" value="saligia"></property>
    <property name="value" value="30"></property>
</bean>
对于setter 形式的参数注入,我们可以通过 property 属性来设置参数。
3. 复杂类型的参数值:
上面只说了下简单类型的参数,比如 String, int, long. 这种简单类型,我们可以在value中通过string 来体现,但是注入 List, Map 等其他类型我们改如何处理呢.
- Map 类型 :
1
public void setMap(Map<String, String> map)
1
2
3
4
5
6
<property name="map">
     <map>
         <entry key="first" value="1"></entry>
         <entry key="second" value="2"></entry>
     </map>
</property>
对于 Map 类型, 我们需要在 property 或者是 constructor-arg 的标签下添加一个子标签map 具体的形式如上。
- List 类型 :
1
public void setList(List<String> list)
1
2
3
4
5
6
7
<property name="list">
   <list>
       <value>list1</value>
       <value>list2</value>
       <value>list3</value>
   </list>
</property>
对于 list 类型, 我们需要在 property 或者是 constructor-arg 的标签下添加一个子标签list 具体的形式如上。
- Properties 类型注入 :
1
public void setProperties(Properties properties)
1
2
3
4
5
6
<property name="properties">
     <props>
         <prop key="name">saligia</prop>
         <prop key="value">30</prop>
     </props>
</property>
Properties 虽然也是继承自Map类型,但是它使用另外的一个标签设置方法
- 依赖其他 Bean :
如果bean中有依赖有其他的 bean, 则需要 ref 标签来将其他bean的id映射进来
1
2
3
<property name="address">
    <ref bean="address"></ref>
</property>
Bean 的工厂类型配置方式:
1.静态工厂方法配置bean
- class :
1
2
3
4
5
6
7
8
9
10
11
12
public class StaticFactoryMethod {
    public static Map<String,Person> map = new HashMap<String,Person>();

    static {
        map.put("first", new Person(1,"jayjay1"));
        map.put("second", new Person(2,"jayjay2"));
    }

    public static Person getPerson(String key){
        return map.get(key);
    }
}
- xml 配置:
1
2
3
4
<!-- static factory method -->
<bean id="person" factory-method="getPerson" class="test.Spring.FactoryBean.StaticFactoryMethod">
    <constructor-arg value="first" type="java.lang.String"></constructor-arg>
</bean>
factory-method 用来标注工厂的方法.
2.实例工厂方法配置bean :
- class :
1
2
3
4
5
6
7
8
9
10
11
12
public class InstanceFactoryMethod {
    public static Map<String,Person> map = new HashMap<String,Person>();

    static {
        map.put("first", new Person(1,"jayjay1"));
        map.put("second", new Person(2,"jayjay2"));
    }

    public Person getPerson(String key){
        return map.get(key);
    }
}
- xml :
1
2
3
4
5
<!-- instance factory method -->
<bean id="InstanceFactoryMethod" class="test.Spring.FactoryBean.InstanceFactoryMethod"></bean>
<bean id="person1" factory-bean="InstanceFactoryMethod" factory-method="getPerson">
    <constructor-arg value="second"></constructor-arg>
</bean>
实例工厂首先需要对工厂类定义bean, 然后才能定义指定对象的bean配置。
Bean 之间的关系
这里说的继承和java的继承是不一样的,不是父类子类。但思想很相似,是父bean和子bean
1、父bean是一个实例时。它本身是一个完整的bean 2、父bean是模板,抽象bean,不能被实例化,只是来被继承。
当遇到一个类要实例化出很多相似的bean对象时,看起来是不是很不简洁,我们可以创建一个父bean, 后续的都从这个继承
1
2
3
4
5
6
7
8
9
10
11
12
13
<bean id="hello" class="com.saligia.spring.bean.helloworld.HelloWorld">
    <property name="name" value="saligia"></property>
    <property name="value" value="30"></property>
</bean>


<bean id="hello1" parent="hello">
    <property name="address">
        <bean class="com.saligia.spring.bean.helloworld.Address">
            <property name="value" value="test"></property>
        </bean>
    </property>
</bean>
Bean 的作用域
1
2
<bean id="hello" class="com.saligia.spring.bean.helloworld.HelloWorld" scope="singleton">
<bean id="hello" class="com.saligia.spring.bean.helloworld.HelloWorld" scope="prototype">
singleton: 此bean为单例,在context创建时已经创建,并且只有一个实例。 prototype: 当需要时创建实例。 —
Bean 的自动装配
bean 可以通过autowire设置自动装配功能,设置bean自动装配以后,容器可以从装入容器的bean中选择合适的装入到当前bean中。
byName 根据属性名称自动装配。如果一个bean的名称和其他bean属性的名称是一样的,将会自装配它。 byType 按数据类型自动装配。如果一个bean的数据类型是用其它bean属性的数据类型,兼容并自动装配它。
1
<bean id="hello" class="com.saligia.spring.bean.helloworld.HelloWorld" scope="prototype" autowire="byName">
Bean SpEL:
SpEL是一种强大的、简洁的装配Bean的方式,它通过运行期执行的表达式将值装配到Bean的属性或构造器参数中。
字面值,我们可以在 <property> 元素的value属性中使用#{}界定符将值装配到Bean的属性中。
1
<property name="count" value="#{5}" />
我们也可以将bean封装进去。
1
2
3
4
5
6
7
<bean id="address" class="com.saligia.spring.bean.helloworld.Address">
    <property name="value" value="test"></property>
</bean>

<bean id="hello1" parent="hello">
    <property name="address" value="#{address}"></property>
</bean>
Bean 的外部属性文件
若是有其他代码需要此Spring属性配置,将Spring配置中的属性值设置迁移到外部的 properties 属性文件中,是必需的操作,这也可以使Spring配置文件更易读。
我们可以通过配置 PropertyPlaceholderConfigurer 来导入外部 properties 配置文件.
1
2
3
4
<bean class="org.springframework.beans.factory.config.PropertyPlaceholderConfigurer">
    <property name="location" value="classpath:system.properties"></property>
    <property name="fileEncoding" value="utf-8"></property>
</bean>
例如我们的配置文件 system.properties:
1
2
sys.name:saligia
sys.value:20
引用方式:
1
2
3
4
<bean id="hello" class="com.saligia.spring.bean.helloworld.HelloWorld" scope="prototype" autowire="byName">
    <property name="name" value="${sys.name}"></property>
    <property name="value" value="${sys.value}"></property>
</bean>
当然这里只是一个例子, 具体的需要纳入到外部属性文件的内容诸如 : JDBC 的链接,系统参数配置等。
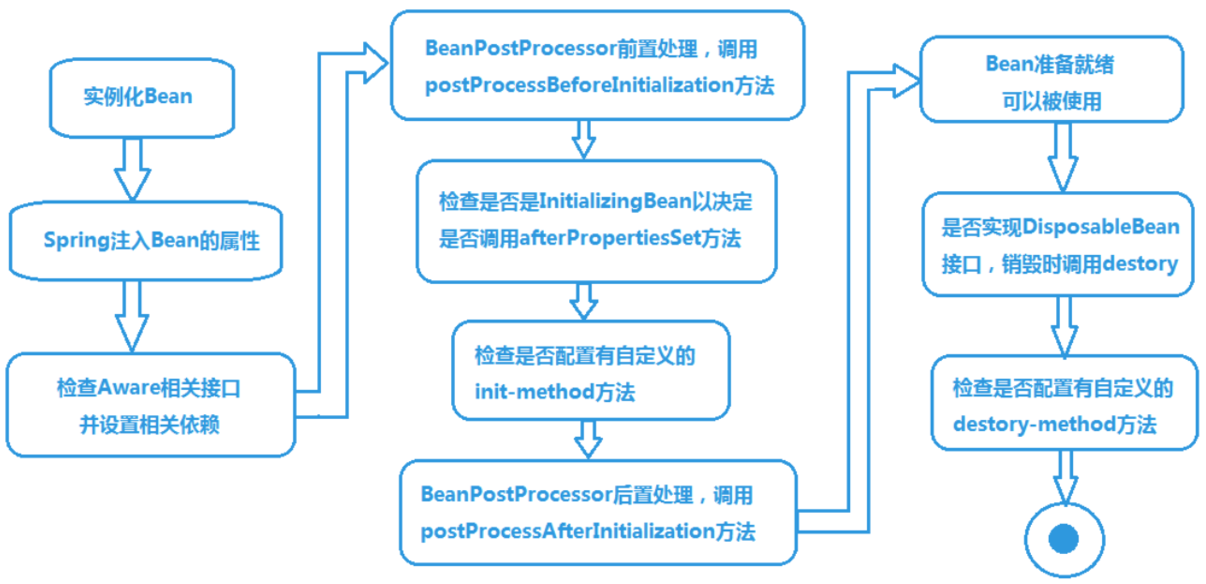
Bean 的生命周期
Spring IOC 容器对 Bean 的生命周期进行管理的过程 :
- 通过构造器或工厂方法创建 Bean 实例
- 为 Bean 的属性设置值和对其他 Bean 的引用
将 Bean 实例传递给 Bean 后置处理器的 postProcessBeforeInitialization 方法 容器中如果有实现
org.springframework.beans.factory.BeanPostProcessors接口的实例,则任何Bean在初始化之前都会执行这个实例的processBeforeInitialization()方法。调用 Bean 的初始化方法
init-method将 Bean 实例传递给 Bean 后置处理器的 postProcessAfterInitialization方法
如果Bean类实现了
org.springframework.beans.factory.InitializingBean接口,则执行其afterPropertiesSet()方法。- Bean 可以使用了
- 当容器关闭时, 调用 Bean 的销毁方法
destroy-method
Bean 后置处理器: 允许在调用初始化方法之前对bean进行处理,需要实现 BeanPostProcesser接口.
1
2
<bean id="hello" class="com.saligia.spring.bean.helloworld.HelloWorld" scope="prototype" autowire="byName"
        init-method="init" destroy-method="destroy">

